The Art of Photography

Thursday 18 November 2010

Positioning The Horizon

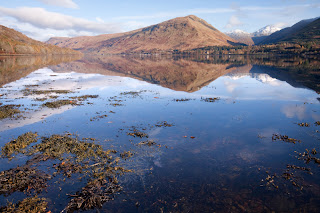
This image is my preferred choice out of the series taken for this exercise.  See my reasons below.


For this exercise our brief was to take a series of photos with the horizon in various positions within the frame. To consider the different elements in each arrangement.
My series is of Loch Fyne. Both the sky and the loch are interesting so choosing the sky over the loch is really a matter of taste as both have drama and focusing on either produces a good picture. The sky has dramatic clouds. The loch has beautiful reflections. 
I then considered the foreground. Lots of foreground with very little sky as in the 3rd image on the right. This is a dramatic image with lots of texture. The horizon is very high in the frame.
On the other hand placing the horizon in the lower part of the frame, as in the images 2nd on the left and bottom on the right, show the drama of the sky.  The clouds and the hills become the dominate factors. 

In the end I decided the image I would work on was the 3rd on the left.
Why?  I like this image placing the horizon in the top third of the frame and incorporating the sky in the reflection. I have moved slightly so that there is strong foreground interest.  I felt that the seaweed in the bottom left hand corner balanced against the hill on the top right hand side.
The exercise is about where to place the horizon but I think that you also have to think why you are placing it in one position over another. 

Wednesday 17 November 2010

Balance

This exercise is looking at the visual balance of the frame.  Taking 6 previously shot photos and deciding how the balance works in each one.
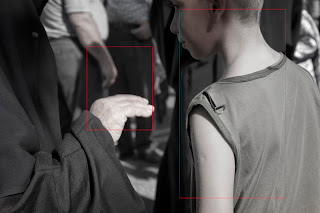
                                                                  The small object is placed near the centre of the frame with the larger object on the right of the frame. The boy on the right is offset by the woman's hand in the centre of the frame.
                                                                  The balance in this image is very similar to the one above of a small object offset by a large object. However in this one the small object is nearer to the left while the large object is closer to the centre. The relationship here is between the man and the bunch of grapes n the bottom of the frame.
This time we have three equal parts placed in the centre of the frame giving symmetry to the image. The wind kite with the man in the middle of the kite gives a centre balanced image.


                                                                   A large and small object offset in this image. Here we are also adding vertical and horizontal lines to the balance. The woman descending the stairs on the very left balanced against the stairs filling the right of the frame.
                                                                  A large and small object in the centre offset by a large object on the right. The large statue with the woman appearing small besdie it are offset by each other and the windows on the right.
                                                                                                                                                                                                                                                                                                                                                                            .                                                                                              
The image below was interesting, as after looking at the balance in this one I decided to crop out a lot of path in the bottom of the image as I felt it added nothing and really upset the balance.  Looking at it now I think it is better balance between the woman with the umbrella and the dark trees in the background.

Initially it was not obvious where the balance in the pictures was. The more I looked at them the more obvious it became.  I could also see how a slightly different composition would have improved some of  The last one especially. I cropped it to make some improvement but there is still too much empty space on the right hand side. Had I been further to the left with the woman walking into the picture rather than in the middle of it, it would be a better picture.

Thursday 4 November 2010

Focal Lengths and Different View Points

 Following on from the previous exercise, this time I have taken an image using a wide-angled lens at 20mm and another with a zoom at 105mm. 
 In each image I have attempted to fill as much of the frame as possible with the statue. Using the wide angled lens I am almost standing on top of the statue. (image left). This image gives a sense of depth to the image.  The foreground appears very close yet the background far away. The strong diagonals created by the fences and tree give a stronger sense of environment and pull you into the picture.
The image on the right taken at 105mm was taken from a distance from the statue. This reduces the depth of the image Giving the feeling that the bacground is very close. You now are forced to study the detail of the statue on its own.
Portrait work would benefit from the zoom lens but the curved edges of the wide angle are not necessarily going to be very flattering if glamour is what you are after.  However a sense of environment may give a stronger image.

Overall from this exercise I can see that thinking about what you want the image to say will determine what lens and focal length you should choose.

Tuesday 2 November 2010

Focal Length

The brief for this exercise was to see the effect of changing from one focal length to another.  Either by using different points on a zoom lens or by changing lens.
I used a 24-105 lens and have taken 3 images, 105mm 67mm 24mm. The camera was set on a tripod and each shot taken from the same position.
The result shows that although the statue in the three images appears closer in the image at 105mm and far away when taken at 24mm, the relationship between the saute and the surrounding environment is exactly the same.  If you zoom in on the 24mm shot it looks the same as the image shot at 105mm. 

Changing focal length while remaining in the same position is about magnification.  How much of the scene and how close I want it to appear.